Tuesday 2 December 2014

On my Easel today - Update

This is moving quite quickly, despite interruptions.   I try to plan for interruptions and if I'm lucky I can get to a stage where paper and paint need to dry, before I have to walk away.  It's good to have time away, as you can lose sight of your goal and end up over-working the painting.   So regular breaks are necessary.  Just because I haven't got a brush in my hand, doesn't mean I'm not working on it though, it's all going on in my head so when I go back to it, I know exactly what I need to do.

Phragmipedium Bel royal - strengthening the shadows by  Polly o'Leary©2014 All rights Reserved
Phragmipedium Bel Royal - Strengthening the Shadows
 Here I've been strengthening the shadows and just bringing the whole painting up to the same level.  If I don't do this, and just paint separate items until they are finished, I find that the painting never really 'gels' for me.  there's also a danger I'll take some parts too far - usually the wrong ones!
Phragmipedium Bel Royal - modelling in colour on top of the shadows  by Polly o'Leary©2014 All rights Reserved
Phragmipedium Bel Royal - Modelling in colour on top of shadows
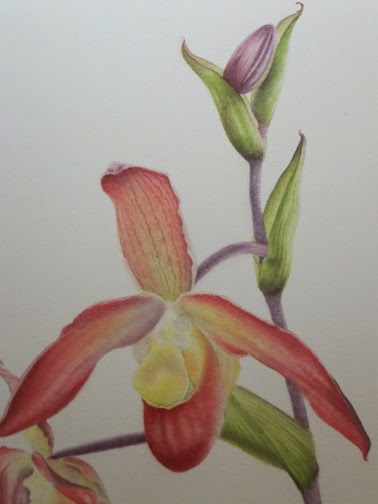
 In this picture you can see I've been strengthening the colours and continuing the modelling in colour on top of the shadow colour.  That top stem under the bud has become too dark, so I'm going to have to take out some of the colour - not easy on this paper, as I turned it around to avoid the water mark, and the paint seems to sink in far too easily. 
Phragmipedium Bel Royal starting to define the markings of the petals and leaves by Polly o'Leary©2014 All Rights Reserved
Phragmipedium Bel Royal - starting to define the markings of the petals and leaves
More washes here, building up the colour in the petals and starting to define the markings of the petals and leaves, along with the bud.   I still have to change the colour of the stems and the bud, but the underpainting is about there.   Then I can start on the details - my favourite bit, as that's when it all starts to really come alive.

Next time I'll also give the lowdown on the colours I've used and the mixes.

Thursday 27 November 2014

On My Easel today...

Phragmipedium Bel Royal sketchbook page

 This is a painting of a flower I fell for 'hook, line and sinker'.   I think, by now, most people are aware of my love of all things Orchid, so it won't come as much of a surprise, but this is an orchid that I'll probably never own.  It just grows too big!   I ran out of space a long time ago and still the collection is growing.  I've had to repot and split a few this week, so I've suddenly got two more plants I didn't anticipate, but I digress.

My new love is an Orchid I met at the Orchid Festival of Wales, on the stand of The Orchid Society of Great Britain.  It's a Phragmipedium Bel Royal and is one of the most striking slipper orchids I've seen.   The colours just glow!

It was one of the flowers I was given to bring home with me to paint, and I've got plenty of drawings and sketches despite having to work so quickly to record it.

Phragmipedium Bel Royal - First washes


 The first picture shows the delicate first washes of colour laid down, reserving the white areas to keep the highlights.  This is the stage where I often feel that it's going wrong and maybe I should start again.  Nerves of steel are needed to continue.  It also takes a lot of patience, waiting for the washes to dry.  Painting on damp washes is one of the quickest ways to dull a painting.

Phragmipedium Bel Royal - Further washes

 This second picture shows how the washes have developed and the shadows are beginning to give shape to the flowers.  Edges need tidying up in places and I'm removing as much pencil as possible at this stage.

Phragmipedium Bel Royal - Even more washes

The last picture shows how further washes have been added and the painting is now starting to look a little more like a pale version of what I have in mind.    There's quite a bit more work to be done and many more washes to come, but not all over.  Pale areas will stay very pale unless I need to adjust them. 

I hope you've enjoyed this work in progress, I'll update it in the next few days as it grows and develops.

Tuesday 4 November 2014

How many colours do you need to paint flowers?

I've been thinking a lot about colour lately.   Specifically, how many colours does a beginner need in order to paint a painting?   Notice the word need, rather than want.

Many beginners in watercolours seem confused as to what colours they need to buy, and I'm sure many of us have bought as many colours as we could afford, thinking that more is better.  Then sat around unsure as to where to begin, overwhelmed at the sheer number of colours in their kit!

So with this in mind, I picked three colours which work really well together and are transparent, and set out to find out how many colours I could make with just those three colours. 

The answer is...  a lot.      I decided to keep my colour chart to just one side of watercolour paper, and a bit smaller than A4.  No reason for the size apart from already having several pieces, all the same handy size.
Three colour chart with Cotman Watercolours ©2014 Polly o'Leary
Three colour chart with Cotman Watercolours

First, I mixed two of each of the colours, adding tiny amounts of one colour to another and recording the colours as they changed.   I did this with each of the three colours.

Then, I picked mixes of two of the colours and added tiny amounts of the third to see what colours I got.

I labelled everything so that I could repeat any colour I wanted just by looking at the chart.

Notice that each primary colour can be changed to either warm or cool by adding tiny amounts of one of the other colours.  So you get a Warm Red and a Cool Red, a Warm and Cool Blue and a Warm and Cool Yellow.    Then, as you continue adding tiny amounts, the colours change to produce a range of Oranges, Purples and Greens.

But that isn't the end of the story, each of those Oranges, Purples and Greens can be further changed by adding tiny amounts of a primary colour to produce progressively warmer or cooler versions of the colour.   And as you add more and more of the primary, you get a range of browns, golds and greys.

All of this was done using only Cotman Watercolour paints, since this is often the paint bought by beginners, but you'd get the same results using Artist's Watercolurs too.

As I was enjoying myself, I then decided to make colour charts with six colours guided by a MaimeriBlu Tryout Set I had hanging around (In the Cotman Chart below, I used seven colours as I wanted to see the difference between PG7 Phthalo Green, and PG36 Phthalo Green in the mixes) .   But this time, I limited my mixes to just two of the colours, otherwise I'd still be mixing colours.

Six-colour Palette Mixes - Cotman, MaimeriBlu and Artist's Watercolours ©2014 Polly o'Leary
Six-colour Palette Mixes - Cotman, MaimeriBlu and Artist's Watercolours


So there you are,  it's possible to mix a huge number of colours with just three well chosen tubes of paint - certainly enough colours for your first tentative steps in Watercolour.   And it's possible to mix an almost infinite number of colours with just six well chosen tubes of paint.    Good news for anyone wanting to start painting in watercolour without spending a fortune.


More on Colour

Lightfastness Testing #1

Lightfastness Testing #2 - Results

The Problem Of PY153 - New Gamboge, Indian Yellow

Saturday 27 September 2014

No rest for the wicked!

Polly o'Leary at the National Botanic Garden of Wales

The stall was well received, with lots of interest, and plenty of business cards taken.  My meagre supply of note cards swiftly disappeared and after the frantic five months of painting, it was such a relief to have such positive feedback.

What wonderful people Orchid enthusiasts are!  At the end of the Orchid Festival, I was astounded and humbled to be given several orchid flowers to bring home, very carefully, and paint from life.   Of course, this meant that the idea of putting my feet up after such a long and intense stretch of painting and general getting everything ready, not to mention the festival itself, was not going to happen.  You can't put many Orchid flowers in the fridge to extend their lives, it often has the opposite effect.  So they were placed in sealed pots with damp paper.

Instead, out came easel, pencils, paints, ink, dividers, rulers and paper, and of course the magnifying glasses and loupes.  And so the race against time began.

One of the Orchids, a Stanhopea, only lasts about 4 days in flower, and by the time we packed up, it was already almost 3 days old, so that was the first one recorded.   It was also the most intricate and strange Orchid flower, looking like something out of a sci fi film, so lots to note and record.   I also got sketches of the main flower spike and the rest of the plant whilst at the festival.  Strangely, I wasn't at all bothered by drawing and painting in front of people after the first few minutes.  But the detailed drawings will be so much more helpful.

The other Orchid flowers weren't too bad by the time I got to them, the Phragmipedium sedenii was the worst and with the warm weather faded fast, so I'll have to find another plant to complete the sketches in more detail.  Phragmipedium 'Bel Royal' was much better and I was able to make some really detailed sketches and colour notes of this lovely orchid before it finally collapsed.

Sudamerlycaste locusta was another strange Orchid and the one I painted last, it being very robust and of a heavier texture.   I'm still trying to find out what pollinates this plant - the lip is so interesting and intricate!

My grateful thanks go to Dr Kevin Davies for the Sudamerlycaste locusta flower,  Val Micklewright of The Orchid Society of Great Britain, for the Phragmipedium flowers, and Andrew Bannister of Orchid Alchemy, for the Stanhopea graveolens flower.   Many thanks also to everyone else at the Orchid Festival, for making it such a wonderful weekend.

Of course, I also managed to come home with three new orchid plants,  a Paph. sukhakulii in flower (guess what I'm working on now?), a baby Paph. 'Vanda Pearman', and a baby Anoectochilus albolineata - as if I didn't have enough orchids already!  many thanks to Francis of Phalaenopsis and More and Andrew Bannister for these plants, they look right at home here already.

Thursday 4 September 2014

Small is beautiful - Paintings for the Orchid Festival


Polly o'Leary©©2014
Cymbalaria muralis - Ivy Leafed Toadflax

 In the spirit of getting ready for my stand at the Orchid Festival, I have been doing a painting a day.  Obviously they aren't large, but there's one that I think is really ditsy.   It may look like a miniature, but it's a life size view of the plant,  Cymbalaria muralis, common name Ivy Leafed Toadflax.  I have a real soft spot for this plant, it grows where other plants won't grow and seeds itself by burying the seedheads in crevices - which I think is amazing!   In this way, it scrambles over bare walls and along their bases, making a very decorative effect.  I think it's the bees knees, and so do the Bumbles, they can always be found buzzing around this plant on a summer's day.

The tiny brushes  and magnifyer had an outing for this one and despite it's size it took quite a long time to paint.  You'd think a small painting would be quick, but there's less room to move around and more chance of spoiling it.
It's the smallest painting I'm taking to the Festival, and I hope it enables those who see it to realise what a very specal plant it is.

Saturday 23 August 2014

Welsh Orchid Festival at National Botanic Garden of Wales 6th and 7th September

Having a deadline is a mixed blessing.

On the one hand there is a sense of purpose, and the comfort of knowing what you have to do.  No shilly shallying, no procrastinating on what to paint, the decision is more or less made.  Or maybe
But the deadline is fast approaching and there's a feeling of not having enough paintings, or frames or....  time! eek    where did it go?

And of course I have to take time out for other things, like designing and ordering my new business cards.   I'm always amazed at just how much time can be swallowed up by having to work on the computer.  Even when I know what I'm doing, and have everything worked out beforehand, a day can be gone.

So... (drum roll)   at long last, here's my new business card.   


Monday 19 May 2014

Small Things

Faff :-  
Britishinformal
verb
verb: faff; 3rd person present: faffs; past tense: faffed; past participle: faffed; gerund or present participle: faffing
1.

spend time in ineffectual activity.

From oxforddictionaries.com


Having recently spent three months painting like a madwoman, I suddenly found that I couldn't paint at all!   For 2 weeks I mostly slept, catching up on sleep after all the late nights, or should I say early mornings?   Then of course, I thought I'd get right back into painting, especially as I have a deadline to meet.   But it didn't work like that, somehow I've found it really difficult to get started again.  So I've spent time catching up on other things, which have taken a backseat for the last two and a half years.

Having spent a whole week faffing about with paint and paper, I decided that painting small things might be a better idea.

So first thing to be painted was the top few inches of a willow branch with silky catkins.   I just love the silky aments, which remind me of cat's paws.

Willow Catkins - Salix
Miltoniopsis Flower

Then, out came the small pieces of paper, about 3inches by 4 inches.   And after three attempts I have something I don't feel like throwing away - at last! and about time.  A Miltoniopsis flower, which has waited too long for me to get painting and is now beginning to fade to purply hues.


I'm liking  painting the small things,  it may become a regular exercise, just to keep things interesting.


SBA Graduation!

Receiving the Diploma from Course Director Simon
The 9th of May was the day of Graduation from the Society of Botanical Artists DLDC Diploma course, Course 9.  The ceremony was held at the Art Worker's Guild in Bloomsbury, London -  A beautiful old building, and a lovely setting for a gathering of Botanical Artists.

After a long day at the SBA Exhibition, Westminster Central Hall, London, manning the Student Desk and talking to prospective students, it was time for a mad dash through London in a taxi. I even got to say "Follow that Cab" ! 

 Simon Williams, the new Course Director, Master of Ceremonies, did a grand job and kept things fairly  informal.  An international occasion, students had travelled from as far afield as Australia, Canada, Italy and America to name just a few.  Sadly some students were unable to travel to the ceremony, but their names were read out and we celebrated their achievements too.  Refreshments were served and we had the chance to catch up, make new friends and chat to the tutors.

So there we are.  Two and a half years gone in a flash, or so it seems, and the future is filled with botanical possibilities.


Tuesday 29 April 2014

Sketching in the Field - Kit


My Travel Kit
 The weather's warming up, and with glimpses of the sun between showers, spring is starting to make itself felt. Plants waking up, new leaves appearing, new shoots peeping above the soil. My Fritillaries are in bloom, it's the first time I have grown them in the garden and I'm feeling ridiculously pleased.

 All this promises plenty to paint in the coming year, and the added excitement of field sketching.

Last year, as part of the SBA Botanical Painting Diploma, I had to take to the field - literally - and record all the plants in a chosen area, then paint them as field studies. Finally, a selection were composed as a finished piece. This brought some interesting problems. A local marsh produced lovely plants that I'd never seen growing locally before, so it was an exciting expedition. But deciding what to take, and how to carry it, wasn't without problems.

 I decided on a minimalist approach. I already had a lovely mini watercolour box from Daler Rowney, with a tiny Sable brush, but knew more would be needed. I wanted Sable, but didn't want to carry expensive brushes, only to find I'd mislaid or dropped them in the field, with no hope of ever finding them again.

 After much searching online, I found a set of four Sable Nail Art brushes at a price that made me think they probably weren't real sable, but they had such good reviews, I sent for them anyway. The brushes were a nice surprise. They handle really well, pointed Filberts, they're useful as wash brushes and detail brushes. They are pocket brushes, the handles doubling up as a cover to protect the hair in transit. One alteration was needed, a small hole drilled in the end of the handle/cover, to allow moisture to evaporate.

Tiny Daler Rowney Sable brush and Nail Art Brushes
 A small folding plastic palette, propelling pencil, dividers, plastic 6" rule, wodge of putty eraser, a remarkably cheap 130gsm A4 sketch book, packet of tissues, a plastic cup, and two bottles of water completed my kit. I should have taken my official sketchbook, but it was becoming unwieldy to carry and impossible to use without a table. Two bottles of water, because I was working in 90f and no shade. I should have had a large straw hat, but couldn't find one. All this went into a canvas satchel, but rattled round in the bottom, so I'm currently searching for a watercolour sketch bag to keep everything together. The satchel was a real find. Light to carry, but large enough to hold the inflated plastic bags holding a wet cotton pad and any collected specimens. I just need replace the London Olympics picture from the front flap with one of my own, that should be fun.

Sunday 30 March 2014

As one door closes, another opens.

At last, after Twenty Seven months, I've completed my SBA Distance Learning Diploma Course.  I don't know where the time went!  It seems only yesterday I received the box with my course materials.    
Diploma sneak preview © Polly O'Leary 2014 All Rights Reserved, polly0leary@aol.com
The paintings have been packed and sent, along with the sketchbook and now begins the nail-biting wait for the judging. 
Since sending off my work, I've had more time to think.   About what has made it easier to complete this course, and what has made it difficult.
Good brushes.  It's important to find brushes that suit your way of painting and which have the right spring and water holding capacity, with a really fine point.    I found that for me, my Da Vinci brushes with long fine points were the biz.
Good paper.   One of the most difficult aspects of the course for me was the variability of the paper provided.   I was used to the paper, as I bought some to practise with before starting the course and was very happy with it.   But the pad I was sent was a disappointment.   I bought a replacement one which was much better, but not perfect.  I am going to try contacting the manufacturer to find out why it is so variable.  It's almost impossible to do delicate watercolour work on paper that has patches which behave like blotting paper!
Good Paint.  Top quality artist's watercolours are essential to being able to render realistic images and cannot be skimped on.  But it's important not to get seduced by the often romantic blurb of the manufacturers.  I made a point of trying watercolours from all the major manufacturers and all of them are excellent.  Some brands have more colour choice.  One brand has a bewildering selection amounting to hundreds of different colours.    Those new to watercolour often think more colours are better, but when learning about mixing and about the different properties of paints it's better to stick to a limited selection.  In this respect, some companies are very helpful and put together sets which are useful for beginners and reasonably priced when compared with buying the tubes or pans separately.  However, it's best to be aware of which colours you are likely to need, as some manufacturers have a tendency to produce sets with colours chosen for Landscape artists.  Manufacturers also give different names to colours, but a quick look at the pigment number will tell you whether they are likely to be the same, eg. PY153 (Pigment Yellow 153) is named Indian Yellow by some manufacturers and New Gamboge by others, but essentially they are the same colour - a wonderful warm, transparent, egg yolk yellow in mass tone and a cooler yellow when used in a light wash.
The important thing is to get to know your colours really well, know what pigments they contain as well as their names, play with them, mix them, make notes and keep those colour swatches and mixes safe, you never know when you'll need a particular shade for a painting, and having it to hand makes life much simpler.

Monday 27 January 2014

Spoilers!

Well after much thought and preparation, I got stuck into my first Diploma piece.    Fruit or Vegetable/s.   I'd had a hankering to paint this piece since last year, when I tackled the first Fruit and Vegetable Assignment, but as it was the middle of winter there was no chance of attempting it.   So I planned it for the Autumn, knowing that it would make a good subject for my Diploma piece.  

It made for a hectic autumn, completing the Working with Photographs assignment, and preparing,composing and completing the last Assignment - Mixed Flowers, whilst working on the preparation for the Diploma Piece, as I knew there would be no material available at the end of the year and after Christmas.   I did manage to get quite a bit recorded in my sketchbook, and also took plenty of Photographs, but it's never enough.  And of course it was coming to the very end of the fruiting season, which in Wales is very short anyway.   I do love a challenge.

© Polly O'Leary 2014 All Rights Reserved, polly0leary@aol.com


So how come I mainly painted leaves for this assignment?   There was fruit, and at one point I almost cried because the fruit are so fiddly to paint and Long Red Marconi Peppers started to look really attractive with the possibility of nice big juicy washes.  But as my dear son pointed out, I'd then be complaining it was too much red!  He was right, so I mentally gave myself a kick and carried on.   But those leaves!   Curled, holed, crispy and half-eaten, they were all so much fun to paint and against all my expectations, the unusual lack of snow and severe weather meant that I still had viable material in the garden!  I've put it out of sight now, as I started picking holes in it, even before it was finished.    Best to start work on the next one and take another look in a couple of weeks time.  Hopefully I won't be so critical of it then (fat chance!)


Wednesday 15 January 2014

Happy New Year

HAPPY NEW YEAR to everyone !
Well, here we are at the start of 2014 and for course 9, on the last leg.    I'm not alone on this course so I'm sure we're all beavering away.    Good Luck everyone!    Nearly there !
Just taking a little time out today to acquaint myself with some new stuff from Jackson's Art Supplies, a late Christmas present.    My parcel arrived yesterday and here's the photo.
A new sketchbook,  some Spotter brushes - never tried them but should be useful for tiny detailed bits, and some paint -  Jackson's Cobalt Blue, absolutely gorgeous, and DS Quinacridone Deep Gold,  so rich and transparent and just an amazing colour.    Don't you just love new art stuff  ?

Thursday 9 January 2014

Guest Artist at Jackson's Art Supplies


Jackson's Art - Guest Artist Polly o'Leary

Well I should have posted this aaaaages ago, but have had trouble accessing my Blog.   Seems to be sorted now.  

I was amazed and thrilled to be asked by Jackson's Art if I'd like to contribute a blog page to their Guest Artist Blog.  Would I?  Do plants need sunlight?  LOL   It took a while to get the photographs of my work to a standard to be digitised, and then of course there was the write up.  But I got there, and now my work is published on the Jackson's Art Blog in the guest artist section. 

So you didn't see it here first folks, as you should have, but you did see it here at last.

Off now to work on one of my Diploma pieces, and hopefully not have to start again - again!